Friday, September 26, 2014

Carrot Cake with Cream Cheese Frosting

Fall is in the air and so is the aroma of fall baking! Here's a wonderfully moist carrot cake recipe that is chocked full of pineapple, pecans and fall spices. Top it off with mouth watering cream cheese frosting and you will have a crowd pleasing fall dessert. 


Ingredients:
2 cups flour
2 cups sugar
1/2 cup oil
1/2 cup buttermilk
2 cups carrots, grated
8 oz can crushed pineapple
1 1/4 tsp baking soda
1/2 tsp salt
3 tsp pumpkin pie spice
1 tsp vanilla
3 eggs
1/2 cup chopped pecans (or walnuts)

Preheat oven to 350 deg. Mix all ingredients in a large bowl until thoroughly combined, scraping bowl as needed. Pour into a greased 9x13 inch pan. Bake for approx 45 mins or until toothpick comes out clean. Let cake cool and top with cream cheese frosting. 

Frosting Ingredients:
1 8 oz pkg cream cheese, room temp
1/2 cup butter, room temp
1 tsp vanilla
1 lb powdered sugar

Cream butter and cream cheese together. Add vanilla and powdered sugar and mix until smooth. 


Enjoy! 

Tuesday, September 9, 2014

Hand Print Bible School Craft

Don't we all just adore those super cute hand print crafts?! They make such wonderful keepsakes or gift ideas!  Not to mention they are easy and inexpensive and the kid's absolutely love making them! Here's one more to add to your collection! 
Here's what you will need:
Paper plates(the cheapest you can find):)
Permanent marker(any color)
Paint brush
Washable non toxic paint(any color)
12"-18" piece of ribbon or cord
scissors
First, using the permanent marker, write your favorite scripture or quote around the perimeter of the plate. I chose 'I am fearfully and wonderfully made. Psalm 139:14'. 
Next, using your paint brush, paint the palm of your little one's hand with the non toxic paint. 
Immediately press their palm down on the middle of the plate, applying gentle pressure.  Don't worry if they wiggle and mess up the print a little!! Trust me! It's still adorable! 
Next, poke two small holes at the top of the plate, using either your scissors or a hole punch. Thread your ribbon or cord through each hole tying a small bow in the front creating a hanger for that special work of art. 
Last but not least, write their name and age along the bottom. Such a precious Bible craft and keepsake!
Enjoy!

Friday, September 5, 2014

DIY Mine craft Creeper Tote

Here is a quick, easy and enexpensive gift idea for the mine craft enthusiast in your life! Perfect for birthday or Christmas gifts!  This particular bag was used for a birthday gift for one of my daughter's classmates who was having a Minecraft birthday.
You will need:
One large green canvas tote(I found mine in a pack of 3 in the craft section at Wal Mart)
Heat and Bond No Sew Iron On Adjesive(1 yard package, $2.97 at Wal Mart)
Black cotton fabric(1/4 of a yard)
Iron(heated to dry setting)
Cricut or other electronic cutting machine 
First step: heat iron to dry setting. Cut one 12x12 piece of Heat N Bond and one 12x12 piece of black fabric. I say 12x12 because my Cricut cutting mat is 12x12.  Place Heat N Bond sticky side down on top of black fabric and iron according to package directions. 
Second step: Peel white paper backing off leaving adhesive on fabric.
Third step: place your 12x12 piece of black fabric adhesive(shiny) side down onto cutting mat and cut the following shapes to make up the Creeper. I used the Plantin Schoolbook cartridge with my Cricut. At this point you could also cut letters to spell someone's name for a personalized touch. 
Fourth step: Position your cut pieces sticky side down on the front of your bag forming the Creeper.  Make sure they all look lined up and square before ironing according to package directions. 
Continue in the same way if you choose to add personalization to the other side. 

Enjoy your one of a kind Creeper tote!!

God Bless! 

Tuesday, September 2, 2014

Do you know Him?

This is so true!  Sometimes it seems so easy to get caught up in the hustle and bustle of life and all the work we think we have to accomplish. Eventually we unintentionally replace our relationship with the Lord with all the things we think we have to do for the Lord. 
Lord help us to stay focused on You!

DIY Mod Podge Wall Art

Here is an inexpensive DIY wall art idea that can easily be customized to suit anyone's decor style. 

Materials:
Any size piece of wood board
Enamel paint
Mod Podge
Scripture or quote cut from card stock
Picture hanging brackets 

Step one: prepare wood board, cutting to desired size and shape.  Many lumber yards will cut boards for you. My husband had this scrap piece that he no longer needed. 
Step two: Paint wood desired color.
We had a little extra black enamel paint left over from the kitchen cabinets so I just used that. Why buy more when you can use what you already have? Right? 
Step three: Using your Cricut machine or other type of custom cutting divice, cut your favorite scripture or quote from a coordinating color of card stock. I used the 'welding' function with my Stone Script Cricut cartridge. 
Step four: Lay your card stock words out on your painted board exactly how you want them to look when your finished. Don't glue them down with the Mod Podge until you have them placed exactly how you want them!
Step five:  After you have your word placement how you want it, you can begin gluing the words one by one. Apply a thin layer of Mod Podge to the painted board covering an area just big enough for one word. Carefully lay card stock word down on wet Mod Podge and immediately cover the top of the word with another thin layer of Mod Podge. 
Continue gluing one word at a time until finished. You should begin to see the Mod Podge dry transparent within just a few minutes. 
After your board has dried completely, attach hanging brackets if you choose to hang it on the wall.  I used a couple of saw tooth brackets that I already had in my picture hanging stash. 
Hang or display and enjoy your new DIY custom wall art!!

God bless!!


Homemade Pumpkin Bread

Happy Labor Day everyone!!  Hope you had a fun and safe weekend!
Well, fall is knocking on the door, which gets me in the mood for fall cooking!
Here's one of my favorite fall recipes. A moist delicious pumpkin bread that makes 2 loaves, which is handy when you need to take something to church or a friend. It also freezes well.

You will need...
Ingredients:
1 1/2 cups sugar
2 eggs
1/2 cup oil 
1 can pumpkin
1 3/4 cup flour
1 tsp baking soda
1/4 tsp baking powder
1 tsp salt
2 tsp pumpkin pie spice
1/3 cup buttermilk

Preheat your oven to 350 degrees. 

With an electric mixer on medium speed, combine 1 1/2 cups sugar, 1 can pumpkin, 1/2 cup oil and 2 eggs until smooth, scraping sides of bowl with rubber spatula as needed.
Next add dry ingredients and buttermilk.
Mix on medium speed until combined. 
Thoroughly greese 2 loaf pans. 

Divide batter in half filling each loaf pan approx half full. 
Bake at 350 degrees for approx 1 hour or until inserted toothpick comes out clean. 
Remove from oven and let rest for approx 10 minutes before turning out on wire rack to cool.
Serve with butter. 

Makes a delicious addition to breakfast or snack!

Enjoy!

Sunday, August 31, 2014

Buttermilk Ranch Dressing

This is a fast and easy homemade ranch dressing recipe that our family loves! With real mayonnaise and buttermilk, this recipe makes an extra creamy and tangy dressing that goes great with salad, veggies, pizza, calzones and more. 

Ingredients:
1 cup mayonnaise 
1 cup buttermilk
1 teaspoon parsley flakes
3/4 teaspoon ground black pepper
1/2 teaspoon salt
1/2 teaspoon onion powder
1/2 teaspoon garlic powder 
1/8 teaspoon ground thyme 

Whisk all ingredients together until smooth. 

Serve with your favorite salad, veggies, pizza or calzone!
Enjoy! 

Pecan Crusted Pork Chops

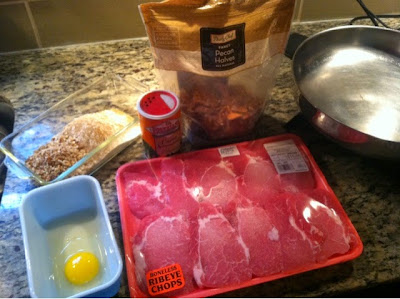
If you're a fan of pork chops, then I would like to recommend this recipe to you!! These pork chops come out juicy and tender every time! The pecan breading with Cajun seasoning adds a wonderful flavor to the crunch. Pair these with your favorite side and potato for a delicious home cooked meal that the whole family is sure to love! These would also go great with a fresh salad and my homemade Ranch Dressing!
Here's what you will need.
Ingredients:
4-5 boneless pork chops
1 egg
1/2 cup flour
1/2 cup finely chopped pecans
1 Tablespoon Louisiana Cajun seasoning
Oil for frying

Pecan Crusted Pork Chops
You can begin by heating your skillet to 375 degrees or medium/high heat(don't add the oil yet). Next finely chop your pecans. I like to use my handy dandy crank nut chopper. But, if you don't have a nut chopper like this one, use your food processor, knife or crush them with a rolling pin between two pieces of wax paper. I have seen nut choppers for sale similar to these on ebay and amazon for approx. $12-$15.
Next combine 1/2 cup all-purpose flour, 1/2 cup chopped pecans and 1 tablespoon of Cajun seasoning. Feel free to alter the amount of Cajun seasoning to suite your tastebuds! If you can't find Louisiana brand Cajun seasoning, any other type of your favorite seasoning can be substituted.
Begin by whisking one egg.  Using a fork, place one pork chop in the egg mixture, coating both sides. Next place egg coated pork chop in flour/pecan mixture and again, coat both sides thoroughly.
Now it's time to add the oil to your pre-heated pan.  I use canola oil but other oils work well too, such as olive, vegetable, etc.  The oil should cover the bottom of your pan and be approx. 1/4-1/2 inch deep. You can tell if the oil is hot by holding a flour/pecan covered pork chop over the oil and let a little flour fall into the oil.  If the flour sizzles immediately, then it's probably hot enough to add the pork chops. If the flour falls to the bottom of the oil with very little sizzle, then let the oil heat a few more seconds.
When the oil is hot enough for frying, lay your first coated pork chop in the hot oil. Continue coating the remaining pork chops and laying them in the hot oil one by one until all are nestled in your pan cooking to perfection! Allow to fry for 3-5 minutes or until the crust appears to be turning a nice golden color.
Turn pork chops and continue.
Yum! Look at all that crunchy pecan goodness!!
The pork chops will be done when they reach an internal temperature of 145-155 degrees.
Enjoy! Let me know what you think! Thanks!

Saturday, August 30, 2014

Homemade Chewy Chocolate Chip Cookies

If you are looking for a moist, chewy, melt in your mouth chocolate chip cookie recipe, then look no further! Pictures cannot begin to describe the deliciousness of this cookie. We make them so much at our house, I have the recipe memorized! This recipe also works well for cookie bars. 
Ingredients:
1 cup butter(2 sticks)
1/2 cup granulated sugar
3/4 cup packed brown sugar
1 egg
1 teaspoon baking soda
1/2 teaspoon salt
2 teaspoons vanilla extract
2 1/4 cups all-purpose flour
1 package chocolate chips

Begin by preheating your oven to 375 degrees. 
Next, get out your large mixing bowl and microwave (approx 45 seconds on high) the 2 sticks of butter until approximately half melted. This is an important step in the chewiness of the cookies. Melted butter makes chewier cookies than room temperature butter. Also, I like to use real salted butter for my cookies but margarine works well too. 
Next, add 1/2 cup granulated and 3/4 cup packed brown sugar. 
Using your electric mixer, mix on high speed until mixture becomes light and creamy. This is also an important step in the chewiness.  Creaming the butter, sugar and egg well helps make the cookies soft and chewy.  Next add 1 egg and continue mixing on high until mixture once again becomes light and creamy. Use a rubber spatula to scrape sides of bowl as needed. 
Next add 1 teaspoon baking soda, 1/2 teaspoon salt, and 2 teaspoons vanilla extract. Mix well. 
Next add 2 1/4 cups all-purpose flour and mix on low speed just until combined. 
Now we save the best for last! The chocolate chips!!! To me, this is the most important part. It's like icing on the cake.  For some reason, I prefer milk chocolate chips over semi-sweet. I'm not sure why. I've just always been a milk chocolate fan. Even with other candy and sweets. I'm milk chocolate all the way! Ok anyways....enough about my love affair with milk chocolate. On with the show. Incorporate the chocolate chips either with the mixer on low speed or a spatula. 
Next, using your handy dandy cookie dough scoop, create delicious mounds of mouth watering cookie dough and space evenly on your favorite baking sheet. I prefer my pizza stone as it creates a nice crispy bottom while preserving the chewy gooey goodness in the middle of the cookie. For all you cookie dough lovers, try your best to refrain from eating the raw cookie dough. ;-)
Next, bake at 375 degrees for 8-10 minutes or until lightly golden. It's very important to NOT over bake your cookies! 
Now all you have to do is sit down, relax and enjoy one your delicious chocolate chip masterpieces.  Even pour yourself a glass of milk. You deserve it!! Your family will be oohing and awing every time they sink their teeth into one of your cookies! 

Enjoy! Let me know what you think! Thanks!!!